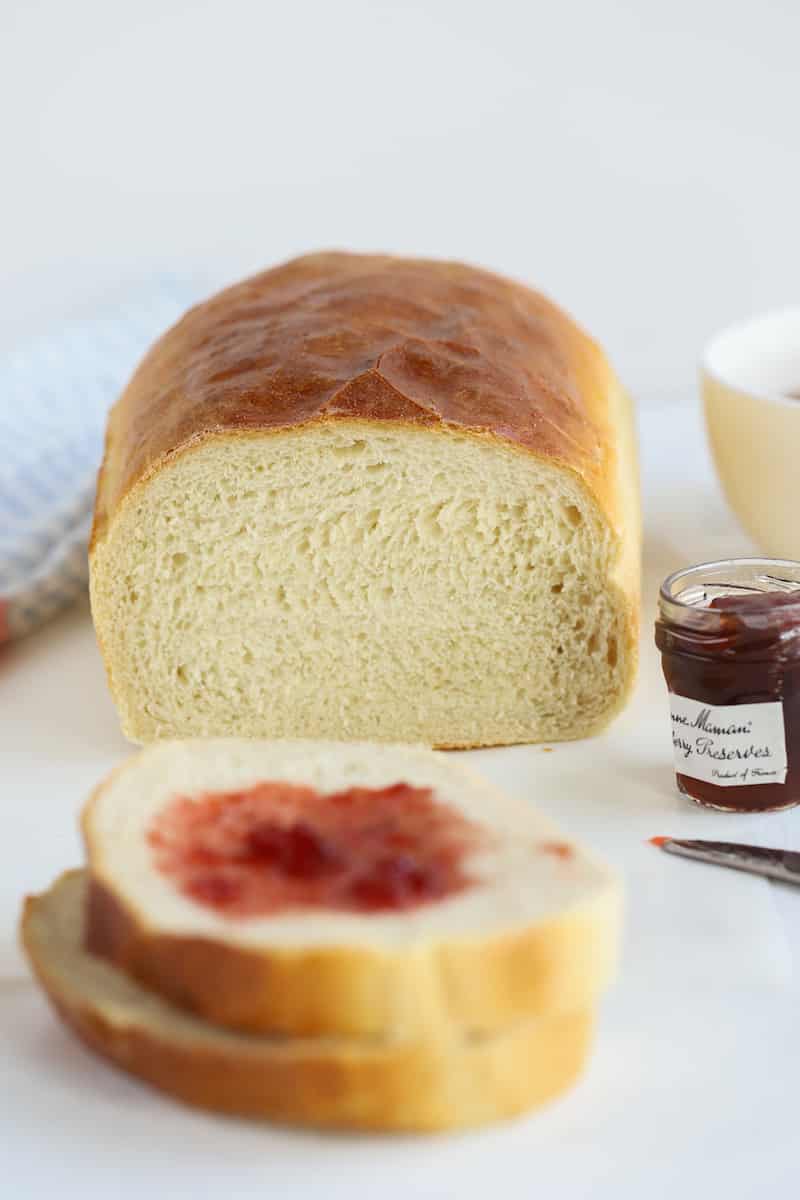
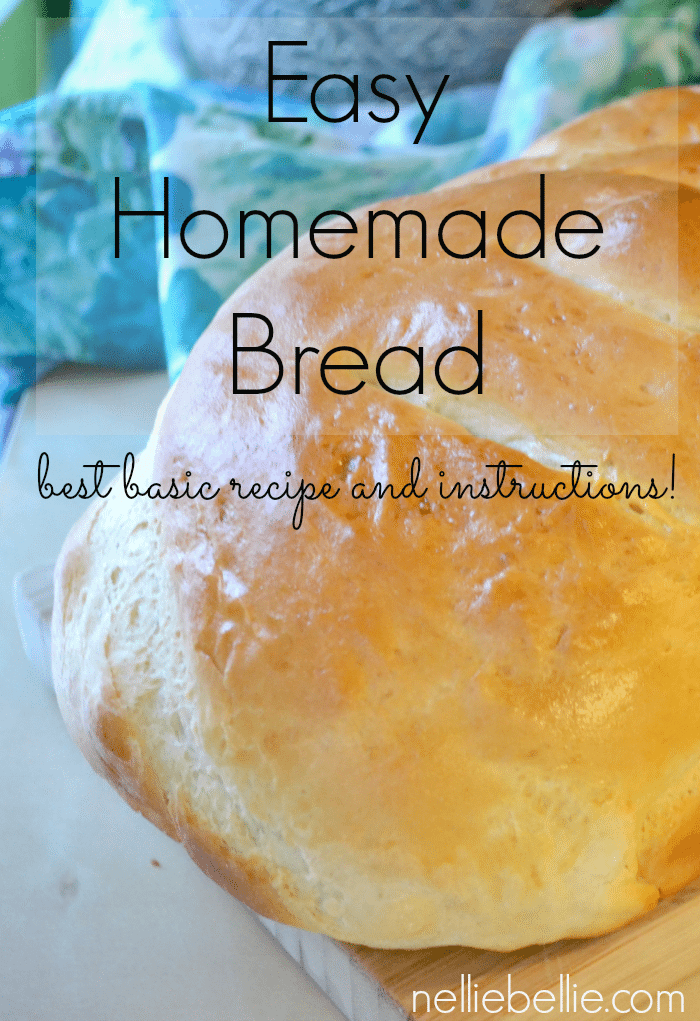
This simple and easy homemade bread uses only a few ingredients just like the old-fashioned homemade bread like Grandma made. I’ve included tips for making homemade bread for those of you, like me, that didn’t grow up learning to make it.
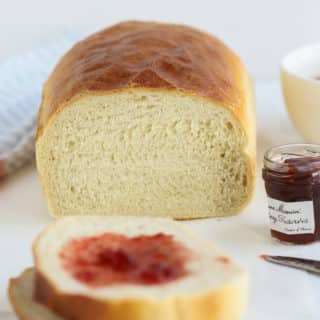
This is the most solid, tried and true bread recipe I know of. It’s not the absolute simplest, this is true. But, this is the way my Grandma made it. And her Grandma. And so on and so forth. And all of that history makes this old-fashioned, homemade bread the best. It just is. And, it is a very basic homemade white bread recipe. A good one for non bread maker’s like me. Perhaps for you, as well!
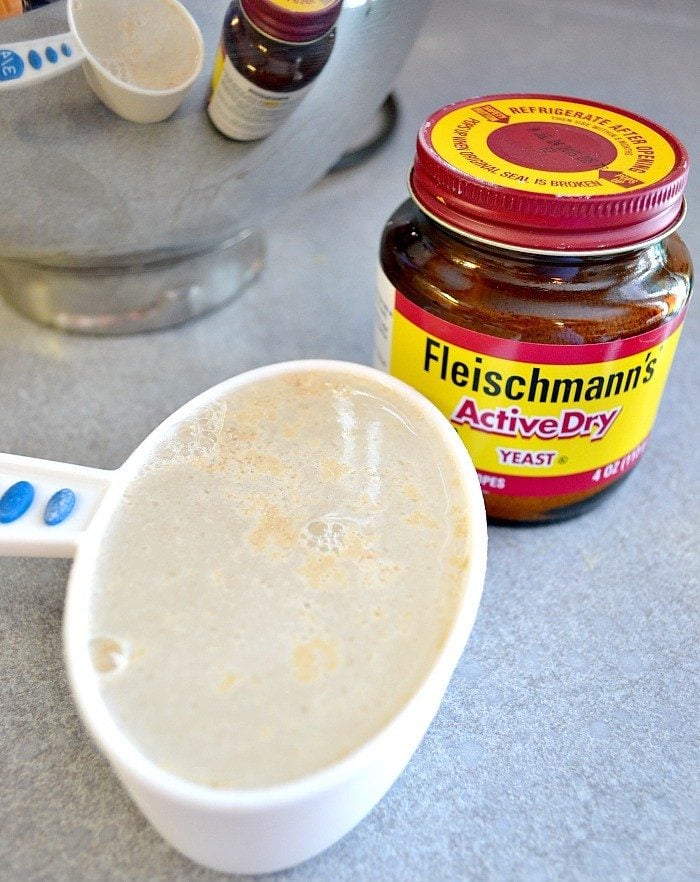
Use fresh yeast. And to keep your yeast fresh after opening store it in the fridge! (I am ashamed to tell you I just learned that yeast had to be stored in the fridge. Hence the reason I’ve had failed bread until the last few years. *sigh*)
When the recipe says to use warm…do it. The temperature makes a difference!
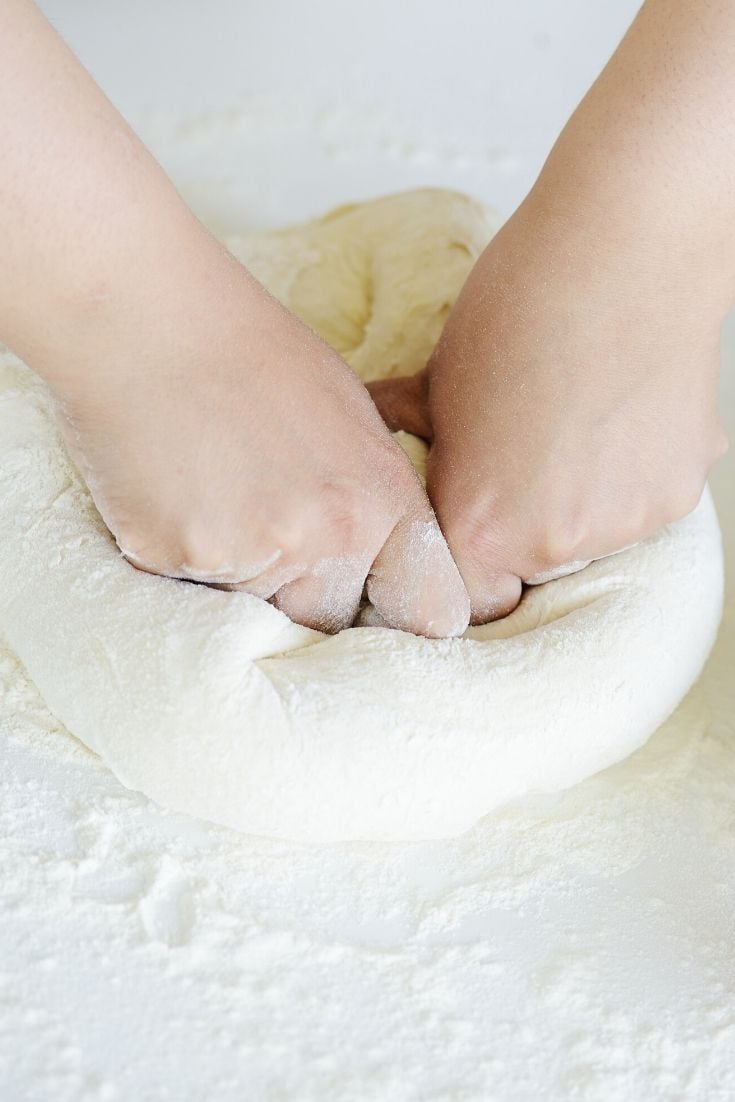
If kneading by hand expect to get a work out. You need to put your muscle into it. If you are short, like me, a stool is sometimes helpful.
Brushing the top of the dough with milk or a beaten egg before baking will give you a nice golden crust.
Preheat your oven first. Don’t put the dough into a cold oven.
You can tell if your bread has risen enough by pressing a couple fingers into it. If the indention remains…you are good.
Slicing bread on it’s side will help it not become squished.
This is what your warm water and yeast will look like when you start. You’ll stir it a bit better than this. But…it will look a bit ooky and gross. Perfect! In professional baking world…this is blooming your yeast.
Does yeast bread scare you? Try my Irish Soda Bread recipe that doesn’t use yeast OR require rising…great for beginning bread makers!
How long should I knead my dough?
You need the dough to be smooth and stretchy. If you haven’t made bread before that could seem like a difficult thing to measure. So the general rule is 10 to 12 minutes if you are kneading it by hand and 8 to 10 minutes if you are using your mixer to do the job.
When it comes time to let your dough rise…your recipe will tell you to use a warm place. I like to just put the bowl on top of a small amount of warm water in another dish and cover with a towel. Toasty warm dough! Don’t put it near a drafty window or leave it near the fridge.
Always cover your dough with a cloth or plastic wrap coated with baking spray or your dough will develop a “skin” on it. Not good!
Why is my homemade bread so heavy?
You probably didn’t knead it long enough. You have to be patient and knead the dough properly! Also…you could have let it rise in a spot that was far too hot. Warm. But not hot is the magic temp.
How long should I let it rise?
Until it is about double in size. And no more. Over-proving your dough (proving is the baking term for letting the dough rise) causes the dough to be holey, crack on top, and collapse when it hits the oven.
Over-proving is the most common mistake most people make. It is tempting to think that the higher the bread rises…the better. Don’t make that mistake. Let your dough rise until double and then bake it.
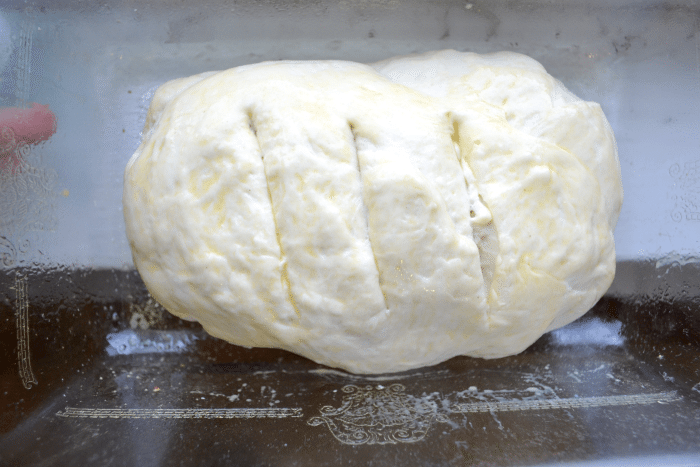
I like to cut a few slits into the top of my dough and use a pretty egg wash on the top of my bread. I even use a vintage glass loaf pan. Doing what my Grandma did. (That loaf pan makes the bread all that better, I swear!)
How to make a “free form” loaf:
If you don’t have a loaf pan you can absolutely use a cookie sheet and make a “free form” loaf of homemade bread. You’ll want to bake it a bit less because it won’t be as thick. But, don’t fret about the loaf pan.
Simply shape the dough into a loaf, set it on a greased cookie sheet or whatever pan you have, and bake it according to the directions. It will not get as tall as a traditional loaf without the confines of the pan to direct the dough. And, you may find that you’ll have to bake it less. But it will still result in a delicious loaf of bread!
Freezing bread dough is a convenient way to have fresh bread whenever you want it without starting from scratch.
Here’s how to do freeze bread dough:
Prepare the Dough: Make your bread dough according to your recipe. You can freeze the dough at almost any stage, but it’s usually best after the first rise when the dough has been shaped into a loaf or rolls.
Initial Rise: Allow the dough to rise once as you normally would. This helps develop the flavor and texture of the bread.
Shape: After the first rise, punch down the dough and shape it into loaves or whatever form you desire. If you’re making rolls, shape them accordingly.
Flash Freeze: Place the shaped dough on a baking sheet and freeze it for a few hours until it is firm. This step prevents the dough from sticking together or losing its shape when stored.
Wrap and Store: Once the dough is firm, wrap it tightly in plastic wrap or a freezer-safe bag, removing as much air as possible. Label the dough with the date and type of bread.
Freezing Duration: Bread dough can be frozen for up to 4 months. Beyond this, the yeast may not be as effective, and the quality could decline.
Thawing and Baking: When you’re ready to bake, thaw the dough in the refrigerator overnight or at room temperature for a few hours. It’s important to give the dough time to come to room temperature and complete its second rise. This could take several hours, depending on the dough and room temperature.
Baking: Once the dough has fully risen, bake it according to your recipe’s instructions. You may need to add a few extra minutes to the baking time if the dough is still a bit cold when it goes into the oven.
Remember, different types of dough may respond differently to freezing. Yeast breads generally freeze well, but doughs with more fat, like brioche, might not rise as much after being frozen and thawed. Experiment with your favorite recipes to see what works best.
And, of course…you can freeze homemade bread!
Cool the Bread Completely: Before freezing, make sure your bread is completely cool. If you freeze it while it’s still warm, the residual heat can cause condensation inside the packaging, leading to frost and soggy bread when thawed.
Slice (Optional): If you plan on using your bread for toast or sandwiches, consider slicing it before freezing. This way, you can take out just the number of slices you need each time, rather than defrosting the whole loaf.
Wrap Tightly: Use cling film, aluminum foil, or freezer-safe plastic bags to wrap your bread tightly. This helps prevent freezer burn and keeps the bread from absorbing odors from the freezer. For extra protection, you might wrap it twice or place the wrapped bread in a freezer bag.
Label and Freeze: Label your bread with the date of freezing. Bread can typically be stored in the freezer for up to three months without significant loss of quality.
Thawing: To thaw, leave the bread at room temperature until it’s fully defrosted. If you sliced it before freezing, you can toast the slices directly from the freezer.
Reheating (Optional): If you prefer warm bread, you can reheat it in the oven. Preheat your oven to 350°F (175°C) and heat the bread for about 10-15 minutes or until it’s thoroughly warmed.
Remember, the texture of the bread might change slightly after freezing and thawing, but if done properly, these changes should be minimal.
In a large bowl, mix the honey and warm water together, add the yeast and stir until dissolved.
Add 2 1/2 cups of the flour and the salt to the yeast mixture.
Stir until you get a ball of dough. The dough will be soft.
—all of these parts are super handy to do if you have a mixer!
Put the dough on a floured surface. Knead until smooth and stretchy (about 9 minutes) adding in the remaining flour as needed to keep the dough from becoming too sticky.
—if you have a mixer with a dough hook…use it here!
Place the dough in a bowl sprayed with cooking spray or coated with oil.
Put the bowl in a warm place and cover with a towel (or use my warm water in bowl method above :)) or plastic wrap sprayed with cooking spray.
Let the dough rise until doubled in size. (about 45 minutes)
Punch your down and then cover and wait 5 minutes.
Gently shape the dough into a loaf.
Place in loaf pan coated with spray, butter, shortening.
Cover (again with a towel or sprayed plastic wrap) and let rise until doubled again (about 45 minutes)
Preheat oven to 450 degrees F (230 degrees C)
Bake at 450 degrees for about 20 minutes.
if you like…apply a egg or milk wash before baking.
Don’t be scared to try some of the old, favorites from the past! If you’ve never made homemade bread…try it! If you’ve never made your own latte…try it! Or if that’s intimidating, maybe start with Mexican coffee you can create with just some brewed goodness? With a piece of toffee, perhaps?
More bread recipes:
Cranberry Walnut Banana Bread Just like Grandma’s with a couple of extra goodies. Easy to make and always a crowd favorite! Fruit-studded monkey bread Only 3 easy ingredients to make this pull-apart bread. A gorgeous bread that I often serve for holiday mornings! Parmesan Ranch Pull Apart Bread Does it get better than Parmesan and Ranch? I think not. This bread once again utilizes biscuit dough to make a fast and easy appetizer bread. You’ll love this one!
Did you try making bread for the first time…let us know how it went! Do you have additional tips and tricks for first-time bread makers to use…tell us and we’ll add them to the bottom of this post!
Janel Hutton finished Professional Cooking Fundamentals coursework in Sur La Table Culinary Institute, has been featured on many websites, magazines, and brands including Better Homes and Gardens, Woman's Day, Cottages and Bungalows, Country Living, Reader's Digest, she was a Stillwater Gazette Columnist, taught classes for Pinners Conference, and much more...
AUTHOR OF:
Spices, Sauces, & Condiments, Slow Cooker Essentials, and Creative Gift Ideas: 52 Unique Gift Sets
32 thoughts on “the BEST Homemade Bread | simple recipe, tips, and tricks.”
Nellie
I love the swap of black truffle sea salt and garlic infused olive oil…soooo good! Thanks for coming back and leaving a comment, I appreciate it!
Bob
Love this recipe. I am a novice when it comes to bread making and this recipe came out fantastic. I used a black truffle sea salt in place of regular salt and lined the bowl in which the dough rose with a garlic infused extra virgin olive oil. Thanks for the amazing share.
Nellie
Thanks for the catch!! We recently updated our recipe formatting and a few places have gone wonky and not been included. Slowly, we are getting things fixed. Thanks for letting us know.
Kalypso
You need to add the honey in the directions. I had to read all the posts to get to the part with the honey in with the yeast.
Nellie
No, not really. Part of that would be in how long the bread rises. The less rising, the denser the bread But, I don’t think this would be the recipe for you. Sorry about that!
Diane
My grandmother made bread that had a strong yeasty flavor and was kinda dense, I would really like to dupliclate #1 the taste and then #2 the texture. Does your recipe have either of these?
Nellie
Colette, I’m sorry I’m so late in getting this answer to you. Big fail in the comment returns. Add the honey with the yeast. You are right!
Colette
Success at last! Looks good, tastes good – we are friends forever! The only question I have is where do you add the honey?? In the list of ingredients but not in the directions. I put a bit of sugar with my yeast, but I think the honey may give it a better taste. Is that where you add the honey? Also my dough was very dry – I added a tablespoon of warm water – it helped. I didn’t want to mess with the recipe too much. I will make this one again – and master it!
Nellie
Oh dear. I surely hope you have success! I know the feeling of not having bread recipes quite work. But, when they do…it is so fantastic!! Please do report back. Hopefully with very, very good news!
Colette
I have been trying to become a bread maker. I am going to make your recipe today and will let you know how it turns out. I have had 3 failed attempts – not actual failures with different recipes prior to this. You instructions are good and I am off to the kitchen to see how this goes today!
Anonymous
you just use the honey on it because it tastes good
Dina
Love this!!!!
Katrina
I just made this! So good! Your Grandma made bread like mine :)
the Bellie
Thanks so much Linda! We agree, the fewer preservatives and GMOs, etc, the better.
LINDA
I LOVE THIS SITE!!!!! ABOUT TIME WE WENT BACK TO BASICS. SO HEALTHY AND NO PRESERVATIVES!!! I NEED MORE!!!!!!!!
LINDA
Misty Johnson
Thank you!!
Nellie
We aren’t breadmaker’s either! But, if it’s simple and easy…we are all over it! Yes…try the all-purpose flour. It should do well for you. Let us know how awesome your homemade bread is!
Erica
I also wanted to know if we can use all-purpose flour. I didn’t even know there was special bread flour <—-can you tell I'm not a breadmaker??
Anonymous
I found the answer in an older comment…
miznelliebellie says
January 22, 2014 at 2:17 pm
I’m so glad you are going for it!! You add it when you mix the dry and wet (at least I do)
Misty Johnson
Sorry.. when do you use the honey?
Misty Johnson
When you use the honey?
freedom
Can you use all purpose flour instead of bread flour, and can you use sugar instead of honey, if so how much? Love hot homemade bread and butter.
miznelliebellie
I’m so so glad!!! Isn’t it so terribly yummy!
Shawna
I made the bread this morning, and made the whipped butter to go with it. Oh my goodness, so good!! Thanks for the recipes!
miznelliebellie
Thanks!!
miznelliebellie
I’m so glad you are going for it!! You add it when you mix the dry and wet (at least I do)
Sometimes, your altitude can have something to do with it. But, I would let it rise a bit longer. The longer it rises the fluffier it gets :). Yum! Congrats on your bread!!
Jill
I have always had a major fear of making my own bread but your post inspired me to just TRY it already. Two questions:
1) when are you supposed to add the 1tsp of honey? Did I miss that in the instructions?
2) my bread turned out a little dense and chewy. Did I do something wrong or do you have any tips on making it a bit softer and fluffier? Still tastes good and the whole loaf will be gone by tonight.
Thanks again for motivating me!
Dollie
Wonderful recipes.
miznelliebellie
Yum. absolutely!
Jane's Adventures in Dinner
and lots of maple syrup…
miznelliebellie
I bet I can think of something better :). But, not much!! Love homemade bread!!
Bliss
You know, if I think on it, I’m hard pressed to name something I like better than homemade bread all warm with butter.
Leave a Comment
Scroll to Top
Looking for something more?
If you’re a blogger or business owner in need of marketing support and resources, you’re in the right place!
Learn more about Janel Hutton’s expert marketing guidance, support, and resources at the link below.


I love the swap of black truffle sea salt and garlic infused olive oil…soooo good! Thanks for coming back and leaving a comment, I appreciate it!
Love this recipe. I am a novice when it comes to bread making and this recipe came out fantastic. I used a black truffle sea salt in place of regular salt and lined the bowl in which the dough rose with a garlic infused extra virgin olive oil. Thanks for the amazing share.
Thanks for the catch!! We recently updated our recipe formatting and a few places have gone wonky and not been included. Slowly, we are getting things fixed. Thanks for letting us know.
You need to add the honey in the directions. I had to read all the posts to get to the part with the honey in with the yeast.
No, not really. Part of that would be in how long the bread rises. The less rising, the denser the bread But, I don’t think this would be the recipe for you. Sorry about that!
My grandmother made bread that had a strong yeasty flavor and was kinda dense, I would really like to dupliclate #1 the taste and then #2 the texture. Does your recipe have either of these?
Colette, I’m sorry I’m so late in getting this answer to you. Big fail in the comment returns. Add the honey with the yeast. You are right!
Success at last! Looks good, tastes good – we are friends forever! The only question I have is where do you add the honey?? In the list of ingredients but not in the directions. I put a bit of sugar with my yeast, but I think the honey may give it a better taste. Is that where you add the honey? Also my dough was very dry – I added a tablespoon of warm water – it helped. I didn’t want to mess with the recipe too much. I will make this one again – and master it!
Oh dear. I surely hope you have success! I know the feeling of not having bread recipes quite work. But, when they do…it is so fantastic!! Please do report back. Hopefully with very, very good news!
I have been trying to become a bread maker. I am going to make your recipe today and will let you know how it turns out. I have had 3 failed attempts – not actual failures with different recipes prior to this. You instructions are good and I am off to the kitchen to see how this goes today!
you just use the honey on it because it tastes good
Love this!!!!
I just made this! So good! Your Grandma made bread like mine :)
Thanks so much Linda! We agree, the fewer preservatives and GMOs, etc, the better.
I LOVE THIS SITE!!!!! ABOUT TIME WE WENT BACK TO BASICS. SO HEALTHY AND NO PRESERVATIVES!!! I NEED MORE!!!!!!!!
LINDA
Thank you!!
We aren’t breadmaker’s either! But, if it’s simple and easy…we are all over it! Yes…try the all-purpose flour. It should do well for you. Let us know how awesome your homemade bread is!
I also wanted to know if we can use all-purpose flour. I didn’t even know there was special bread flour <—-can you tell I'm not a breadmaker??
I found the answer in an older comment…
miznelliebellie says
January 22, 2014 at 2:17 pm
I’m so glad you are going for it!! You add it when you mix the dry and wet (at least I do)
Sorry.. when do you use the honey?
When you use the honey?
Can you use all purpose flour instead of bread flour, and can you use sugar instead of honey, if so how much? Love hot homemade bread and butter.
I’m so so glad!!! Isn’t it so terribly yummy!
I made the bread this morning, and made the whipped butter to go with it. Oh my goodness, so good!! Thanks for the recipes!
Thanks!!
I’m so glad you are going for it!! You add it when you mix the dry and wet (at least I do)
Sometimes, your altitude can have something to do with it. But, I would let it rise a bit longer. The longer it rises the fluffier it gets :). Yum! Congrats on your bread!!
I have always had a major fear of making my own bread but your post inspired me to just TRY it already. Two questions:
1) when are you supposed to add the 1tsp of honey? Did I miss that in the instructions?
2) my bread turned out a little dense and chewy. Did I do something wrong or do you have any tips on making it a bit softer and fluffier? Still tastes good and the whole loaf will be gone by tonight.
Thanks again for motivating me!
Wonderful recipes.
Yum. absolutely!
and lots of maple syrup…
I bet I can think of something better :). But, not much!! Love homemade bread!!
You know, if I think on it, I’m hard pressed to name something I like better than homemade bread all warm with butter.