Use this easy step-by-step guide to make a fun giraffe cake. It is not too challenging and you don’t have to be a professional baker.
Y’all, this giraffe birthday cake is just too darn cute. And guess what…it’s easy to make! The decorations, my friend, are made from candy. YES, candy! This cake is perfect for a zoo themed party!
Starburst, tootsie rolls, cake mix, and frosting. Those are the supplies you’ll need for this fun giraffe cake. And we’ve supplied a printable template so you can the EXACTLY right measurements and a full photo tutorial.

Are you a beginner at cake decorating? No worries, me too! I’ve got a great set of videos to teach you the basic steps of crumb coat, frosting, & frosting swirls. Everything you need to know to make a simple but beautiful decorated cake is on these video tutorials!

What you need: Ingredients & equpment
- 3 Cups Vanilla Frosting dyed Yellow dye it to match the color of the yellow starbursts
- 1.5 cups Chocolate Frosting frosting you have left over from filling and crumb coating your cake. My favorite Homemade Chocolate Frosting Recipe ⬅ .
- 28 Tootsie Rolls
- 8 pink Starbursts
- 16 yellow Starbursts
- 1 yellow cake box mix (and the ingredients to make it)
- 1 chocolate cake box mix (and the ingredients to make it)
- Powdered Sugar, use as needed
- Printable template for snout, eyelashes, & ears.
- 8-inch round cake pans
- Offset spatula


Step 1: How to make the patterned cake
- Mix both cake mixes according to the directions on the box (in separate bowls).
- Grease 2 (or 4 if you have them) 8 inch round cake pans.
- Pour one cup yellow cake batter into the center of the pan.
- Pour one cup chocolate batter into the center of the pan, on top of the yellow batter. The yellow batter should spread slightly so you have rings.
- Repeat until the pan is filled 1/2 of the way with batter.
- Repeat process with each additional pan.
- Bake the cakes in the oven, let them cool slightly, then flip out of the pan and cool completely.
- After the cakes have completely cooled, move on to the decorating.
- Place one of the cake layers of cake on your cake board and apply a layer of chocolate frosting. Repeat for each layer.
- Apply a thin layer of yellow frosting all over the cake as a crumb coat.
- After crumb coating, put in the fridge to allow frosting to set, about 30 minutes.


Step 2: How to create the ears
- Warm 8 yellow Starburst to make them easier to work with. Put the unwrapped candies in a microwave safe bowl and microwave them in 5 second intervals until they are easy to mold and not too hot to the touch.
- Knead together the 8 yellow Starbursts to form one candy.
- Sprinkle counter with powdered sugar. Roll out formed yellow Starbursts to inch thickness. You don’t want it too thin. If it is sticky, you can add a little powdered sugar to it.
- Repeat steps 1-3 with all of the pink Starbursts.
- Using the stencil, cut out the shape of the ears to the corresponding color on the stencil. If you choose not to use the stencil, eyeball the shape of the ears cutting out the yellow ear first.
- Cut the pink ear an inch smaller than the yellow.
- Brush a little water to the back of the pink piece and place on top of the yellow piece. The water will act as a glue, holding the pink piece in place.
- On the bottom part of the ears brush a little bit of water, about an inch up.
- Then fold in the bottom corners together and pinch to secure. This gives the ears a 3D effect.


Step 3: How to create the horns
- Warm up 8 tootsie rolls same as you did with the starbursts in step 1. Knead to form one candy and then cut it in half. Each half will be one horn.
- Roll out each half like a snake to the size and form to the shape of the pattern.


Step 4: How to create the snout
- Take the remaining 8 yellow starbursts and 10 tootsie rolls and heat following step 1. Combine them to make a lighter brown color.
- Roll out to an inch thickness. Cut out the oval shape.
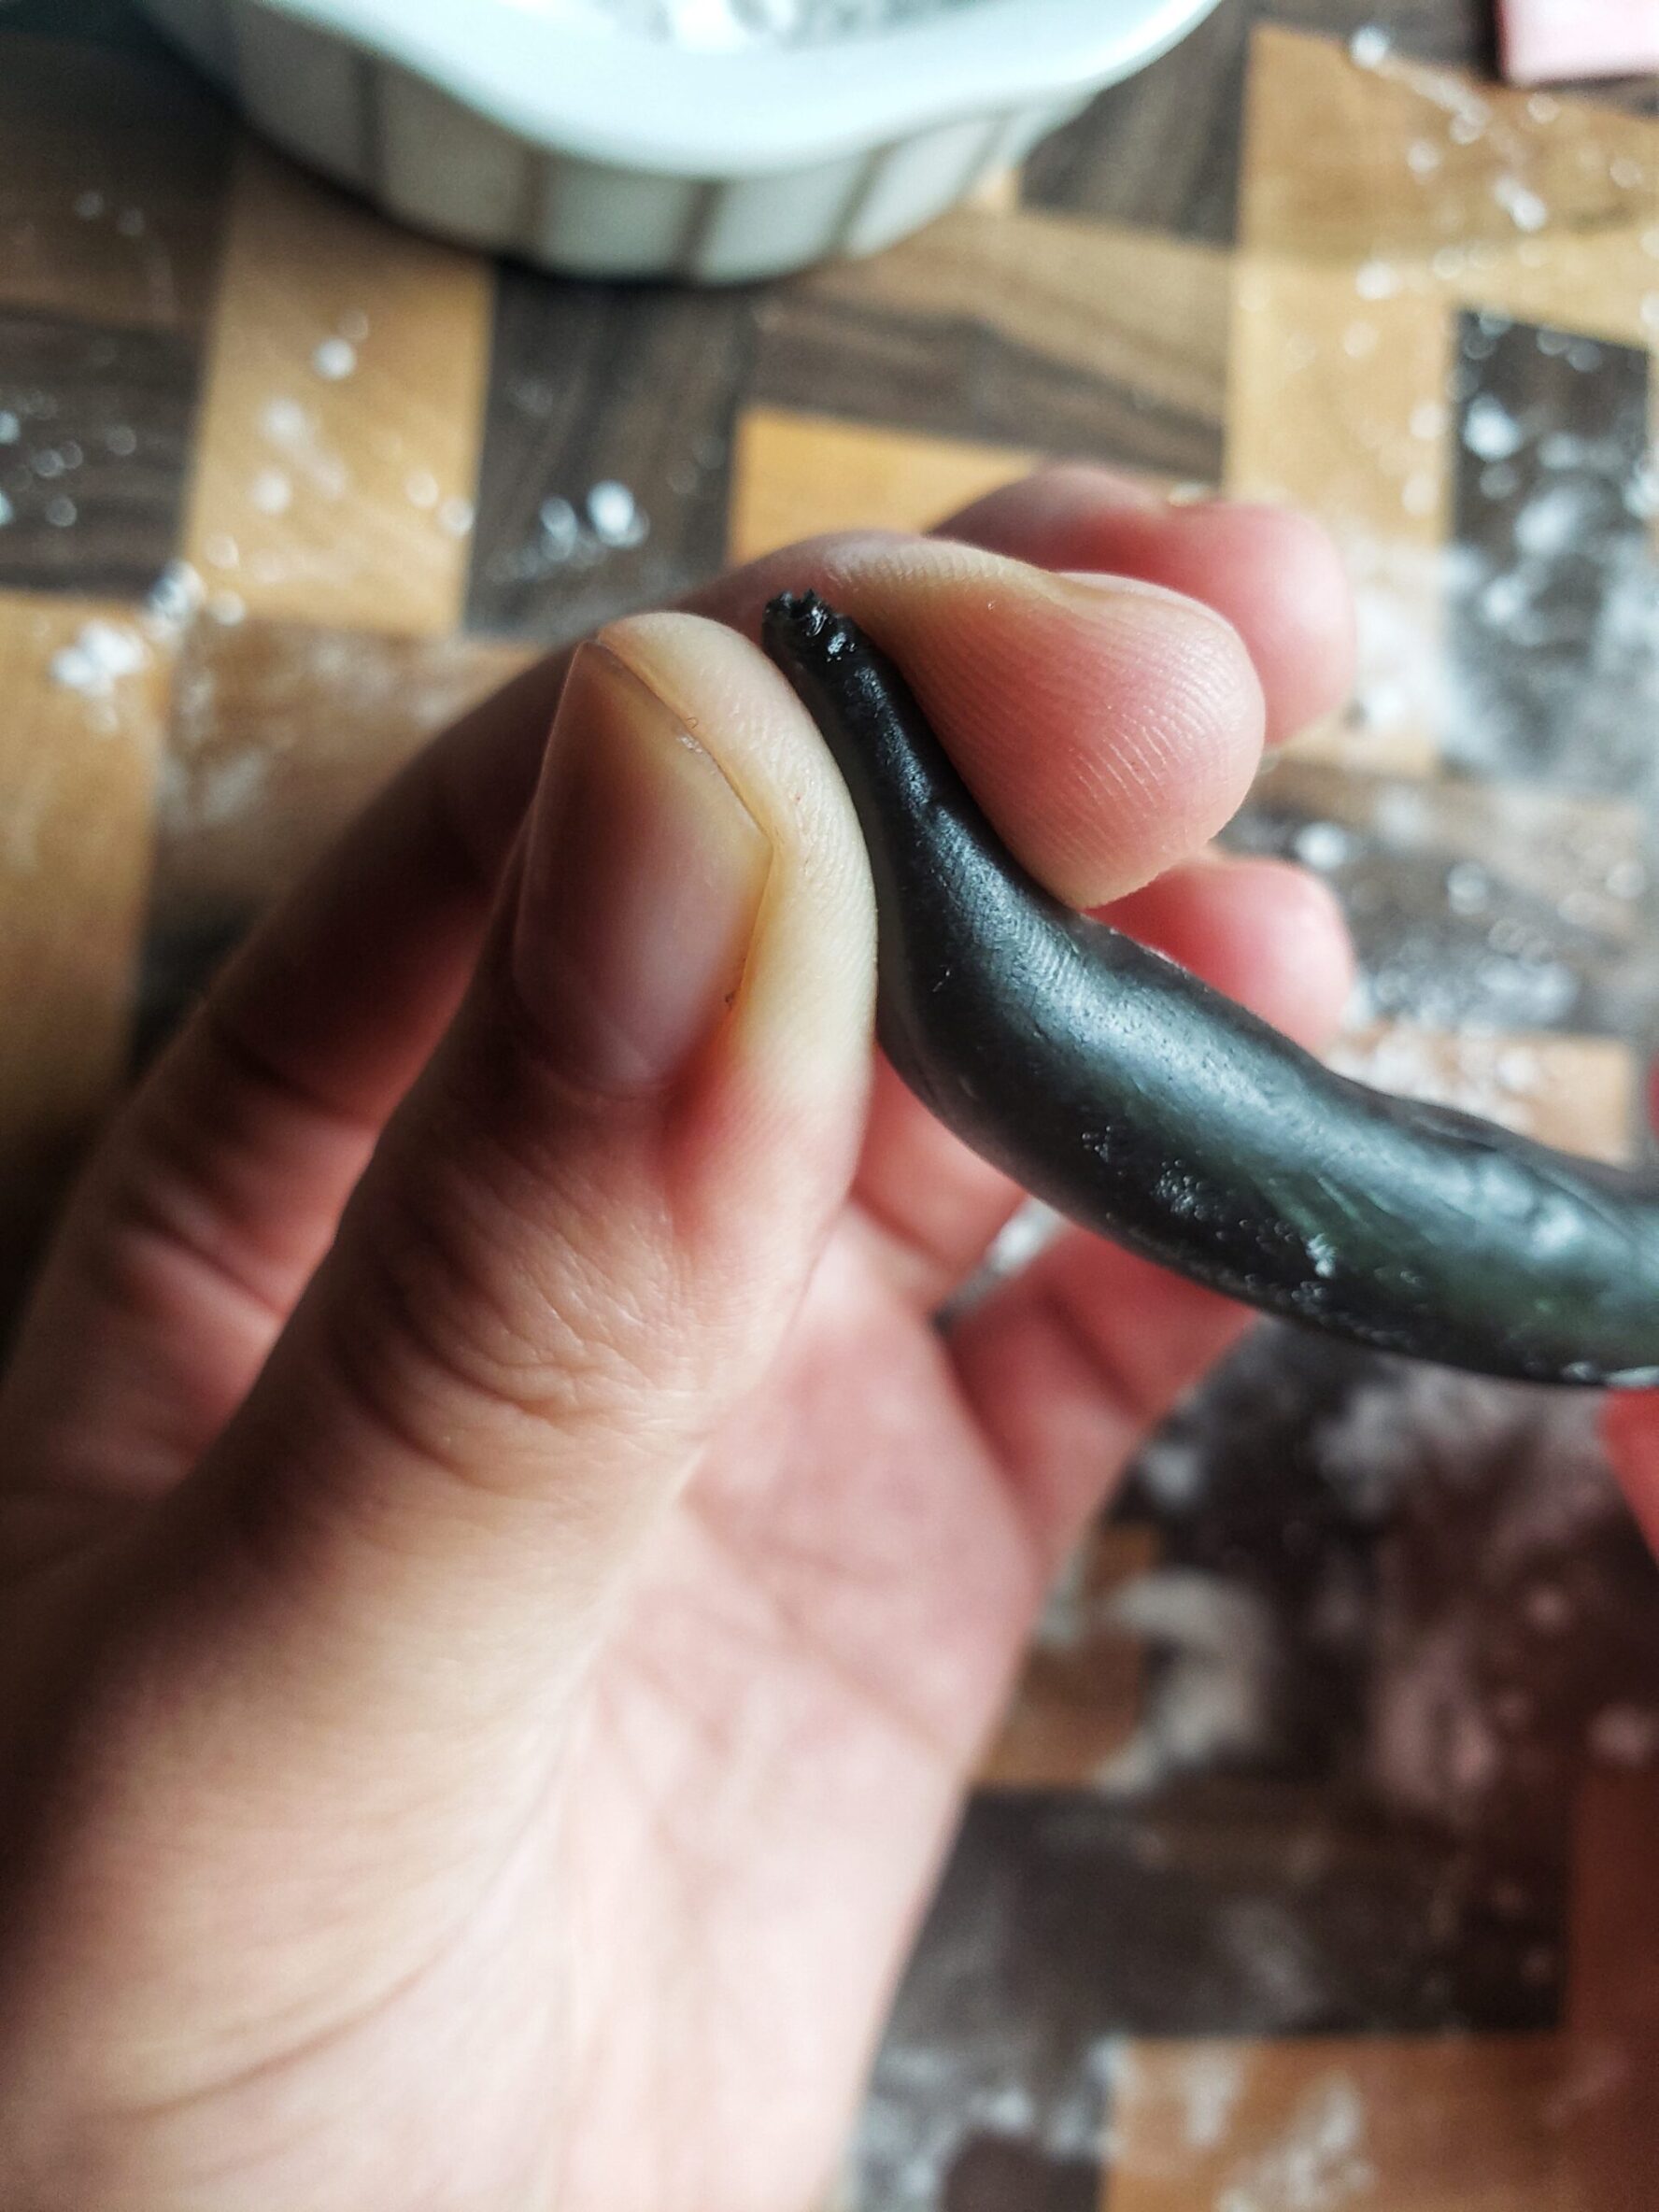
- Warm the last 10 tootsie rolls following step 1 and add a little black food coloring.
- Mix together until food coloring is all combined. Roll out to 1/8 inch thick. Cut out the 2 circles (save the remaining rolled out tootsie roll for step 11).
- Add a little water to the back of the black pieces and place them at the top middle of the oval to make the nose.


Step 5: How to create the eyelashes
- Re-combine the black tootsie roll candy that you saved from step 10 and cut in half.
- Roll each piece to the length of the eyelash stencil and cut off. Make two cuts at the end to form eyelashes and pinch them to be pointy. Do this again for the other eye.


Step 6: How to create the giraffe print
- Add your yellow frosting all around the cake and smooth out with a spatula, or a flat surface.
- You can smooth out the frosting more by putting it in the fridge for 30 minutes and then use paper towels to smoothen the surface. Do this by placing paper towel over the top of frosting and rub hand over the paper towel to smooth frosting.
- Pipe on the brown frosting to form the spots of the giraffe. Do not put spots where the face will go.
- Smooth out the frosting. You can do the same paper towel technique to smooth out the spots.

Step 7: Finish the decorating
- Add on the nose to the front bottom of the cake where you didn’t put spots.
- Place the eyes above the mouth. Make sure the eyelashes are on the left far side and the right far side of the face.
- Place the ears and the horns on top of the cake. You will need to push them into the cake

Isn’t that Giraffe Cake pattern so fun!! The best part is how easy it is to make that lovely swirled pattern.

Ingredients
- 3 Cups Vanilla Frosting dyed Yellow dye it to match the color of the yellow starbursts
- 1.5 cups Chocolate Frosting frosting you have left over from filling and crumb coating your cake
- 28 Tootsie Rolls
- 8 pink Starbursts
- 16 yellow Starbursts
- Powdered Sugar use as needed
Instructions
How to create the giraffe ears
- Warm 8 yellow Starburst to make them easier to work with. Put the unwrapped candies in a microwave safe bowl and microwave them in 5 second intervals until they are easy to mold and not too hot to the touch.
- Knead together the 8 yellow Starbursts to form one candy.
- Sprinkle counter with powdered sugar. Roll out formed yellow Starbursts to inch thickness. You don’t want it too thin. If it is sticky, you can add a little powdered sugar to it.
- Repeat steps 1-3 with all of the pink Starbursts.
- Using the stencil, cut out the shape of the ears to the corresponding color on the stencil. If you choose not to use the stencil, eyeball the shape of the ears cutting out the yellow ear first.
- Cut the pink ear an inch smaller than the yellow.
- Brush a little water to the back of the pink piece and place on top of the yellow piece. The water will act as a glue, holding the pink piece in place.
- On the bottom part of the ears brush a little bit of water, about an inch up.
- Then fold in the bottom corners together and pinch to secure. This gives the ears a 3D effect.
How to create the giraffe horns
- Warm up 8 tootsie rolls same as you did with the starbursts in step 1. Knead to form one candy and then cut it in half. Each half will be one horn.
- Roll out each half like a snake to the size and form to the shape of the pattern.
How to create the snout
- Take the remaining 8 yellow starbursts and 10 tootsie rolls and heat following step 1. Combine them to make a lighter brown color.
- Roll out to an inch thickness. Cut out the oval shape.
- Warm the last 10 tootsie rolls following step 1 and add a little black food coloring.
- Mix together until food coloring is all combined. Roll out to 1/8 inch thick. Cut out the 2 circles (save the remaining rolled out tootsie roll for step 11).
- Add a little water to the back of the black pieces and place them at the top middle of the oval to make the nose.
How to create the eyelashes
- Re-combine the black tootsie roll candy that you saved from step 10 and cut in half.
- Roll each piece to the length of the eyelash stencil and cut off. Make two cuts at the end to form eyelashes and pinch them to be pointy. Do this again for the other eye.
Assemble cake
- Place one of the layers of cake on your cake board and apply a layer of chocolate frosting. Repeat for each layer.
- Apply a thin layer of yellow frosting all over the cake as a crumb coat.
- After crumb coating, put in the fridge to allow frosting to set, about 30 minutes.
- Add your yellow frosting all around the cake and smooth out with a spatula, or a flat surface.
- You can smooth out the frosting more by putting it in the fridge for 30 minutes and then use paper towels to smoothen the surface. Do this by placing paper towel over the top of frosting and rub hand over the paper towel to smooth frosting.
- Pipe on the brown frosting to form the spots of the giraffe. Do not put spots where the face will go.
- Smooth out the frosting. You can do the same paper towel technique to smooth out the spots.
- Add on the nose to the front bottom of the cake where you didn’t put spots.
- Place the eyes above the mouth. Make sure the eyelashes are on the left far side and the right far side of the face.
- Place the ears and the horns on top of the cake. You will need to push them into the cake just about an inch to get them to stay or you can add a toothpick to the bottoms of them.
Notes
will have less cake to cut off the top to make your layers level.
-Use parchment paper in the bottom of your pan for easier removal of cake.
-Use a cake board the size of your cake to make it easier to move cake from your work surface to the fridge. Some cake
stands are too tall to fit your cake and stand in the fridge while you’re decorating it.
-Use a large ice cream scoop to add your cake batter to the pans.

Ingredients
- 1 yellow cake box mix
- 1 chocolate cake box mix
Instructions
- Preheat oven to 350.
- Mix both cake mixes according to the directions on the box (in separate bowls).
- Grease 2 (or 4 if you have them) 8 inch round cake pans.
- Pour one cup yellow batter into the center of the pan.
- Pour one cup chocolate batter into the center of the pan, on top of the yellow batter. The yellow batter should spread slightly so you have rings.
- Repeat until the pan is filled 1/2 of the way with batter.
- Repeat process with each additional pan.
- Bake the cakes, let them cool slightly, then flip out of the pan and cool completely.
- After the cakes have completely cooled, move on to the decorating.
Notes
will have less cake to cut off the top to make your layers level.
-Use parchment paper in the bottom of your pan for easier removal of cake.
-Use a cake board the size of your cake to make it easier to move cake from your work surface to the fridge. Some cake
stands are too tall to fit your cake and stand in the fridge while you’re decorating it.
-Use a large ice cream scoop to add your cake batter to the pans.
If cooking isn’t your thing, these giraffe bookends are another good tribute. If you like themed food, you might want to try our Dr. Who Jammy Dodgers.


It is sad, isn’t it? But don’t let this ruin zoos for you! Many of them really are about caring for animals that just wouldn’t survive in the wild…and they are great educational resources to help people better understand the need to protect animals from poachers, etc. It’s just a select few that need to be given a talking-to.
How sad, we recently bought passes for the tulsa zoo and I we have gone once and this made me just not want to go again that much more. Yes people like to see all the animals but it cannot be so serious as to make any zoo greedy enough that animals look poorly, no room to roam or not able to do things they would in the wild or be killed period. I mean all the money they make plus contributions. It’s not like the animals want to be there anyway. I steer clear, especially of circus acts.
Haha; thanks. And we love our zoo here in Minnesota, they do a great job of caring for and protecting animals. That’s what zoos should be about. It’s just the few really awful ones giving the rest a bad rap.
Gorgeous cakes! Stop trying to tell me that you aren’t a baker.
I always find zoos so sad. I like our Toronto Zoo as they do a lot of rescues and the animals have so much room.
We’ve a great reptile zoo right near us that small one would live at if we let her and they only have animals that have been rescued.